Tuesday, May 31, 2011

Control of slugs and snails in the garden

4 comments:
Slugs and snails are a problem. Where we live on the coast in Asturias, we enjoy an ideal temperate climate that is also just right for the proliferation of slugs and snails. Their favourite habitat is in the crevices of the limestone walls, snuggled into the roots of long meadow grass, hiding in the shelter of leaves on a multitude of favourite plants, clinging precariously to the walls of the house, or just below the surface of exposed soil... In other words, wherever it is warm and damp.


When we were in the UK we successfully used nematodes to reduce the population but where we are now, the amount of land we have and the position we are in makes this method of control too expensive and probably a waste of time.

We have tried various methods of control, some of more use than others and some, more strategic and less haphazard. We only use organic or natural methods in the garden so chemical control is excluded. The methods we have tried include:

Prevention Methods:
Reducing the population of slugs and snails where possible - collection and disposal after rainfall or early evening is a good time to do this;

Increasing natural habitats for frogs, hedgehogs, toads, slow worms, beetles and birds, all natural predators of slugs and/or snails. This has worked to a point and the added bonus of garden visitors is a joy to see;

Organic slug pellets - we have tried these and they work but alas they are not available here in Spain so the small supply we have, is used sparingly. The advantage of these pellets is that there are harmless to animals and birds unlike the ordinary pellets some people use in abundance;

Sowing seeds into pots or half a drain pipe to give young plants a good start - this has helped reduce the number of fatalities early on.


Barrier Methods:
Coffee grinds can help - this is supposed to be toxic to slugs and snails but beware, using coffee grinds extensively can increase soil acidity - it works but needs regular renewal;

Copper rings around the base of new trees and shrubs can help act as a deterrent. When the slug or snail glides over the copper, they apparently get a small electric shock. This method was only successful a couple of times for us in combination with other methods;

Crushed egg shells - egg shells, baked and crushed surrounding the plants can act as an effective barrier - works well but needs renewal;

Ash - wood ash from the fires can also be used as an effective barrier particularly around salad crops - renewal necessary especially after rainfall;

Sheep wool pellets - I brought a couple of tubs of this new product back from the UK and it seems to work very well. A barrier of pellets is put around the base of the plant and then watered - it mats together like felt and eventually breaks down into the soil.  http://www.sluggone.com


There are of course other methods such as beer traps, half a grapefruit skin placed on the soil, grit.....and so on. If you have found any methods that work for you, please get in touch or leave a comment. We would love to hear from you.

Thursday, May 26, 2011

How to make a quick and easy Garden vegetable quiche

No comments:
In the second instalment of my celebrations of 50 years a vegetarian, I will give you my recipe for the easiest quiche in the world. This dish is an adaptable, quick and foolproof recipe for a tasty meal for a picnic, lunch with salad or dinner with roast vegetable, however, before that, a little memory from my experiences of being a vegetarian.


On a night out in Dewsbury with old friends Heather and Malcolm we had booked a meal at a newly opened restaurant/bistro. Arriving at 8pm, and to cut a long story short, our starters finally arrived at 10pm. Luis had ordered vegetable samosas which arrived looking like they'd been attacked by a rabid pigeon. As we attempted to tackle rock hard honeydew melon, Luis enquired as to why his samosas had seen better days. Not even I was prepared for the reply. "We've run out of vegetable ones so the chef has taken the lamb out of the lamb ones and just left the vegetable", explained a young, naive and hapless waiter. Needless to say, we soon departed, without paying, without the spectacle of our main course and with our stomachs and thoughts still rumbling.

Normally, quiche bases are pre-cooked and typical short crust pastry doesn’t stay crisp for more than a day. I use this particular pastry recipe as it is easy to handle, stays crisp for a couple of days, it doesn’t need pre-cooking and is a bit more transportable for events like picnics or village gatherings. Never having tasted quiche before, our neighbours and fellow villagers really enjoyed this dish and always request I bring one should a gathering take place.
Garden Vegetable Quiche  - 28cm tin
For the pastry:

200g margarine
300g Flour
1 Egg
Crushed oregano
Salt

Bring all the ingredients together with a fork then by hand, cover in cling film and chill in fridge until next stage is complete.

For the filling:

2 Medium onions
2 grated carrots
Half a cup of sweet corn (peas, red pepper  or tomatoes can be used in place of sweet corn)
4 eggs
100 gm of grated cheese
350 ml of milk
1 teaspoon of mustard
Salt and ground black pepper (to taste)
Oregano to taste

Heat oven to 200 degrees centigrade.
Roll out pastry on well-floured surface. Line quiche dish/tin by rolling pastry around the rolling pin and gently lifting it into place. Mould to dish and trim excess (use for a smaller quiche or cheese and onion pasty).


Put all the filling ingredients into a dish and mix well. Pour into the uncooked pastry case and spread evenly. Place in a hot oven for 15 minutes then reduce the temperature to 175 degrees centigrade and cook for a further 45 minutes, turning occasionally to ensure it gets evenly brown. Cool in tin and enjoy.

For a smaller quiche, half the ingredients or make two and freeze one pre-cooked.

Tuesday, May 24, 2011

New blog for mosaics by Luis

1 comment:
Due to the overwhelming success of Luis' blog for chair restoration and mosaic making, we have decided to split the two crafts and develop a new blog for his mosaic making. With an upcoming exhibition and increased interest from garden designers and members of the public, we felt the mosaics were worthy of their own site. 

Roman Mosaic for an occasional table

Although the blog will be in Spanish, with translation tools widely available, you can follow his mosaic making exploits easily enough. The un-laid mosaic slabs pictured are from a set made from pebbles and slate which will form a flight of steps and sitting area around the garage and workshop.

His new blog for mosaics is: www.mosaicoslapasera.com - links for both his blogs can be found on the right hand side of this page. Don't forget to keep up to date with all our blogs by subscribing by email.


www.mosaicoslapasera.com

Sunday, May 22, 2011

Protecting strawberries from slug and snail damage

3 comments:
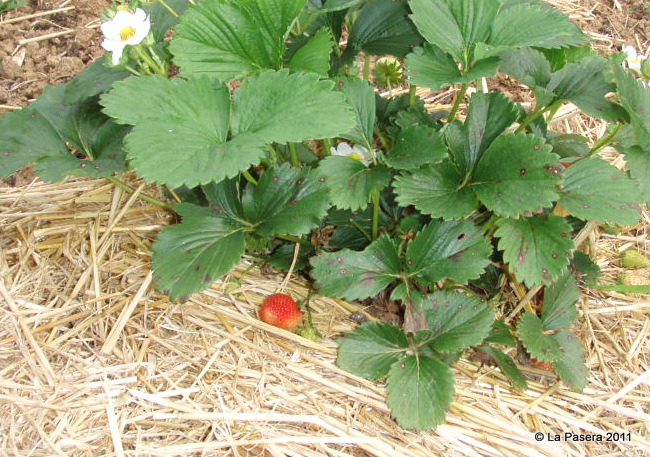
We have a small number of strawberry plants that are in their second and third year of growth. Each year they produce well but the fruits are susceptible to damage from slugs and snails if we are not careful. Up to now we have relied on organic slug pellets, crushed egg shells or wood ash to help protect or to form a barrier around the plants. This has worked, up to a point.


This year we acquired a few bales of straw and decided to try using some to protect the fruits. Not only does it help keep them free from rain damage but it has been a great success in keeping the slimy creatures at bay. The organic slug pellets act as a second barrier but as these are not available here in Spain, we use them sparingly.

Wednesday, May 18, 2011

Great Tits nesting in the garden

2 comments:
Birds in the garden are always a joy to see. La Pasera is surrounded by lush vegetation in the form of fields, pasture land, woodlands and coastal plains, giving the local bird-life a range of habitats on which to feed, roost and nest. One element that is in short supply locally is a reliable, fresh water supply.

Since we installed the wildlife pond and three shallow birdbaths we have seen the number of garden visitors increase dramatically. At the end of last year we made a bird box from old scraps of wood and attached it high up on the trunk of the old cherry tree in the hope that birds would nest. Some weeks ago we noticed several birds exploring the box and we hoped that one of them would decide that it was a safe and secure nesting site.


This past week or so we observed Great Tits franticly flying to and fro desperate to keep their newly hatched chicks fed. They bring a never ending supply of large green juicy caterpillars, grubs and an assortment of flies and insects, consumed by the hungry chicks in seconds, the exhausted parents fly off again to seek more food for their young.

Not wishing to get too close (and bring the nest box to the attention of Gawber the cat), I managed to get a few shots of the male / female in full action. I think they must be near to being fully fledged and hopefully, the surrounding trees and bushes will provide the young birds with plenty of cover once they leave the nest....dangerous times.


This next picture is a female Blackbird having a well-deserved bath in one of the birdbaths we have in the garden. This particular birdbath was spotted by Luis when we were out on a walk once. Washed down from a hillside following a mud slide, it is sandstone and has a natural smooth and curved hollow. He carried it for 5 Km or so back to the car, a hard and heavy task but well worth his effort.


We'll definitely build more nest boxes this year and both enjoy and value what they bring to La Pasera.

Sunday, May 15, 2011

Renewable energy - tea and cake in the garden

1 comment:

Every once in a while it is good to sit back, relax and enjoy a bit of free time in the garden. Watch the world go by, review ideas, think about life in general and take stock. It is one of those days when weeding, mowing the grass, planting, cutting back, dead heading and the rest can wait. Time to enjoy a slice of cake and a pot of tea... Renewable energy.


Wednesday, May 11, 2011

Review of the vegetable garden in late Spring

No comments:
At this time of year we review how the vegetables and salad crops have performed. Luis keeps a notebook recording what grew where, what seeds were sown and when, varieties that perform well and problems and challenges that we faced in the previous season. The notebook is a useful reminder of when and what to sow.

We are lucky in so much that given our temperate climate and being so close to the coast, we can maintain the growing season throughout the year. We are just coming to the end of our leeks and fennel and in the middle of a rather splendid mange tout harvest.


We have three main vegetable beds: two measuring 10x5 meters and one of 10x2 meters. We use a standard rotation system to ensure the soil is not depleted of essential micro nutrients and we add, on a yearly basis, as much manure as we can get and plenty of home-made compost. Manure this year has been a short supply and we are currently looking at alternative sources.

Bed 1 contains: beans, squash, marrow/courgette, cucumber, sweetcorn, sage and a small lavender hedge (great for pollinating insects)

Bed 2 contains: gooseberry bush, strawberry plants, beetroot, peppers, chilli peppers, aubergines and wild tomatoes.

Bed 3 contains: Potatoes (100), tomatoes (12), onions (150 red, 150 white plus another 100 early local variety, peas and mange tout.

Seedlings at the moment include: salad leaves, sweetcorn, beetroot and basil. Still to come later in the season: 2nd crops of cucumber, marrow, beetroot. Winter lettuce, fennel, brassicas, leeks, celery, celeriac, turnips and swede.


Other beds we maintain are a salad and herb garden which contains various types of salad leaves and a range of herbs and plants for infusions and cooking.

Year on year we use more of what we grow and rely less on bought vegetables. All our produce is chemical free. Some crops are bountiful whilst others disappoint, some get attacked or diseased but experience has taught us that there are many natural remedies or prophylactics that can minimise damage or loss of crops. We learn each season from experience, trial and error but that is what growing your own is all about.


Thursday, May 05, 2011

The challenge of growing tomatoes outdoors

No comments:
Tomatoes are a fruit we have always enjoyed growing to use raw in salads, juiced in refreshing drinks and cooked to make passata and pisto, a typical castillian recipe that mixes tomatoes, peppers, pumpkin, marrow, onion and herbs.

Since we came to La Pasera, we have found that tomato growing can be a challenge due to the high air humidity and sea mist that we get at this time of the year causing tomato blight. Even those varieties reported to be more resistant to this common fungal infection succumb if the conditions are such.

The local vegetable growers tend to grow the tomatoes in a sheltered position next to a south facing wall and with some added protection from a roof.

For the last few years we have grown our tomato plants under partial cover as in a mini poly tunnel that we can site in different parts of the vegetable plot according to our crop rotation system. In addition to growing them under cover, we may also use Bordeaux mixture and natural anti-fungal remedies during periods when the weather is particularly humid and still.


This year we bought seeds for a variety of tomato called Alicante, a fairly small but very tasty fruit that seems to like the conditions our vegetable plot presents. We are also trialling a local wild tomato that has small but sweet fruit.

We sowed seeds in early February in a compost that we mix ourselves based on garden soil, well rotted manure, leaf mould and vermiculite. After a few weeks, we potted up the seedlings in fresh compost with added organic slow release fertiliser to be grown on in a sunny and sheltered position before they were planted o the ground in the second half of April. So far the plants are looking very healthy and some are starting to have their second set of blossom.

As the tomato is a plant very susceptible to blight, we prune the side shoots on the young plants and leave only the main stem to flower. We have found that this method increases air flow and makes infection less likely.


The tomatoes we produce will be used fresh whilst the large quantities of fruit we need to make the passata and pisto is gathered from my sister Rita's vegetable plot in Palencia where she grows about 150 tomato plants in a climate that is much hotter than ours. We process about 60-80 kg of tomatoes each year, ensuring we have plentiful supplies of pisto and passata for the coming year.

Wednesday, May 04, 2011

Creating a wild-flower meadow in the garden

2 comments:
Creating a wild-flower meadow in the garden was always on the plan. This year it is looking spectacular and they more than meets expectations. I don't know why more people don't have one. You can create a wild-flower meadow in the garden even in the smallest or unlikeliest of places. Leave a grassy border to grow, see what happens. Create an island in the middle of a lawn, let it grow, scatter seeds gathered from walks in the country side. Grasses, flowers, wild herbs...what ever is native.


Here at La Pasera we were fortunate because the house was built on an old orchard where the meadow had been traditionally maintained with regular, seasonal scything. This method ensures that biodiversity can be maintained by letting plants and flowers reproduce and run to seed, next years display safely deposited in the soil or stored in roots and tubers.

Each year, we leave three islands of grass, in the same place every year, we also leave the grassy borders down two sides of the garden and a small patch down by the old cherry tree. At this time of year it really comes into its own with a magnificent display of wild flowers, orchids, grasses, plantains and more. We think there maybe up to 30 - 40 species of plants at any one time in each area. This changes through the year. We have scattered seeds collected from around our local area and let it take its chance.


Each year, in late June, when most of the seed heads from spring have dried or are drying, we scythe the areas and leave it to dry for a few days. This is then raked and the dry vegetation is added as useful dry matter to the compost heaps. The grasses and flowers soon begin to grow back again and by August, a whole new batch of flowers and grasses are beginning to bloom again. It is left until late October, early November when it is once again scythed, dried and raked.

Not only does it look great, these mini environments create great habitats for crickets, spiders, beetles, butterflies, bees, shrew, lizards, slow worms, moths, grasshoppers, field mice, rato topos, snails and birds. Both Wentworth and Gawber are often distracted by the jump of a grass hopper or the hum of an insect. Stopping and listening for any likely prey that maybe lurking inside.


Sunday, May 01, 2011

April's photograph album

No comments:
Each month I publish a photograph album of images that inspire me. Taken in and around La Pasera, the photographs are not the best technically, but they capture the beauty and diversity that surrounds us. April's offerings can be found here:

April Album

Wednesday, April 27, 2011

Making home-made balsamic vinegar

No comments:
This recipe for home made Balsamic vinegar has been adapted from one found in a herbal book many years ago. It is not the pure balsamic that is associated with Italy but a variation on a theme - a flavoured and marinated condiment that can be used in a variety of ways. Salad dressings, soups, sautéed vegetables and any other dish that needs a spicy, flavoursome vinegar.

We use a good quality cider or apple vinegar but any other basic vinegar can be used as a base. The mix of herbs and spices is really down to personal taste and therefore you might wish to change some of the ingredients we use to others that you prefer. The key to producing a balanced vinegar is to ensure the overall taste is not over powered by one ingredient.


Decant a third of the 750ml bottle of vinegar to make space. Add, a generous sprig of sage, thyme and rosemary. Place 15 black peppercorns, 20 coriander seeds, 12 cloves and 15 cardamom seeds in the bottle along with 30 raisins. Top up the bottle with the remaining vinegar, seal and store in a cool dark place for 2 months. The colour will change slightly as the herbs and spices infuse with the vinegar. Decant and discard the herbs and spices and use as required. We make about 3-4 litres a year for personal use and occasionally a few extra bottles for gifts to friends and family.

An additional use for this vinegar is for cleaning surfaces - use diluted, not only does it disinfect, it will help deodorise as well.

Saturday, April 23, 2011

Easter Horse Racing on the Beach

No comments:
Every year (beach conditions permitting), Ribadesella hosts a horse racing event on Santa Marina beach in the town. Fortunately, there had been no last minute storms taking the sand back out to sea or bringing in tonnes of wood and debris. What flotsam and jetsam had arrived in town had been diligently cleared by the local council in the days leading up to Good Friday.

Luis' birthday fell on Good Friday this week so we walked into town to meet with friends and watch the racing. A much smaller event than previous years (recession and all that I suppose), never-the-less enjoyable and well supported by locals and holiday makers in Town for Semana Santa.

Here are a few pictures and a short video of the event:


Wednesday, April 20, 2011

Snake in the grass - Vipera Berus - Adder - Viper

1 comment:
It is not often we come across snakes but when we do it a great opportunity to take a closer look. The adder is probably the most common snake around here that we see. This one was about 55 centimetres long and 6 or 7 centimetres thick in the middle. This little beauty was crossing the road in front of us when we were out walking near Gaudamia cliffs at the weekend.


I tried to get up close and personal but he was obviously not in a friendly mood and wanted to disappear into the grass verge as soon as possible. Needless to say, Luis was well out of reach...(his pet hate, ssssnakesssss...).


More information here: Vipera Berus on Wikipedia

Monday, April 18, 2011

The garden in Spring

3 comments:
The garden is looking really vibrant at the moment with sharp spring weather encouraging lush and healthy growth. We've lost a few plants over autumn and winter but replaced them where necessary with cuttings given by neighbours or with divisions we made in early spring.

Most of our blog posts are about the growing food side of life at La Pasera. We thought it was about time to celebrate the garden and take stock of where we are and where we are going to with regard to the future of the garden.

We use the garden a lot throughout the year and have tried to find a balance and sympathy to the local landscape.


It has developed slowly over the past 6 years and there is still lots of things to do. We need to pave the patio and steps leading down to it. We are also about to complete a  flight of pebble mosaic steps and small seating area now Luis has nearly finished the 40 mosaic slabs it needs in total. The driveway and front garden still require  attention but as we are doing all the work ourselves, it takes time, money and energy.


The wildlife aspect of the garden is important to us and where we can we encourage insects, amphibians and birds by creating areas that are attractive to them i.e. water, shade and shelter, food. A future project soon to be started I hope, is to build a small transportable hide for photography that can be used in the various areas of the garden. I will let you know how we get on with the design and construction - If anyone has any ideas or plans for such a hide, please get in  touch soon.


Wentworth and Gawber enjoying one of their many vantage points.


Monday, April 11, 2011

Chives - many uses and a great, delicate taste

No comments:
We grow a wide variety of herbs and use them in cooking whenever we can. They add a certain quality to dishes and if used appropriately, they can add a depth of flavour and enhance the flavour of the ingredients of the dish.
Chives have always been a firm favourite. Not only do they look great in amongst other herbs and flowers but they are so versatile.


Fresh chives can be used in salads (including the flowers), chopped and used in egg, cheese or potato dishes. In fact chives can be used wherever its delicate onion flavour is not overpowered. The flowers can be marinated in a good wine or white vinegar for two weeks, strained and then the vinegar used is a variety of dressings and dishes. The vinegar has a lovely pale purple colour which fades over time so it is best made fresh each year.

Beware.....chives have aphrodisiac properties according to Siberian legend and have been cited as an aid to relieve congestion, cold and flu. This year we are also growing garlic chives, not sure how much of an aphrodisiac they will be....

The mass of chive flowers in early spring is also a magnet for numerous species of insects.

Friday, April 08, 2011

Course: Weaving a cane seat - Cursillo: Restauración de sillas en Rejilla

No comments:


Short course in chair restoration – Weaving a cane seat.

Dates: May 20-22nd  or October 7-9th 

Venue: Asturias, Spain

Cost €200 (includes materials, lunch and refreshments)

Content:

Due to demand generated from www.artesanialapasera.com I am pleased to offer a short course in chair restoration – weaving a chair seat in rattan cane. The course will include:

1.   Preparing a chair for restoration
2.   Materials and techniques
3.   Finishing and aftercare

At the end of the course the participants will have woven a chair seat using rattan cane.
Participants can bring along their own chair for re-caning or purchase one from our small stock (details on request)

The course will take place in a workshop at La Pasera. There will be a maximum of 5 participants on each course to ensure quality tuition from the instructor Luis Laso Casas. 

Luis has been restoring cane and rush seating for the past 10 years. He has re-caned and re-rushed chairs old and new from a variety of sources. From exhibition pieces to dining room suites, boudoir chairs to Thonet, he has restored somewhere in the region of 500 chairs and overcome many challenges to accomplish the craftsman finish that has become his trademark. There maybe both English and Spanish participants on the course but as Luis is bi-lingual, this is not a problem. You can also practice your Spanish is you so wish!
   
The programme will commence on Friday lunchtime with an informal chat and lunch. The course will be structured to ensure maximum support for participants and where necessary, one to one tuition. A vegetarian lunch will be provided on each day the course. If you are unsure about anything or if you require further information, please contact Luis at :  artesanialapasera @ gmail.com (no spaces) Telephone 0034 646436562


Cursillo de restauración de sillas: Rejilla

A consecuencia del número de gente quienes me han preguntado donde poder aprender a tejer un asiento de rejilla, esterillado francés, me complace el poner a su disposición los siguientes cursillos de restauración de asientos de rejilla o rattán.

FECHA:

20, 21 y 22 de Mayo del 2011


7, 8 y 9 de Octubre del 2011

LUGAR:

Ribadesella, Asturias, España.

CONTENIDO:

El curso incluye:

Preparación del asiento antes de la restauración.
Materiales y herramientas
Técnicas.
Tintes y cuidados.
Al final del cursillo, los participantes habrán tejido artesanalmente un asiento usando junquillo o tireta de rattán. Los participantes podrán traer su silla si así lo deseasen; de lo contrario, dispongo de una pequeña selección de sillas listas para ser restauradas las cuales están a la venta en caso de que un participante no tenga una silla propia para restaurar.

MATRICULA:

€200.00. La matrícula incluye los materiales, tres comidas principales basadas en una cocina vegetariana y bebidas no alcohólicas durante el día. Puedo facilitar una pequeña lista de hoteles cercanos donde los participantes puedan alojarse durante el cursillo.

Aquellos interesados en participar en este cursillo deben ponerse en contacto con: Luis Laso Casas a través del email artesanialapasera@gmail.com

NUMERO DE PLAZAS:

El número de plazas está limitado a un máximo de 5 participantes.


Tuesday, April 05, 2011

Fence? Hedge? - Repairing the Fedge

No comments:
When we first arrived at La Pasera, clearing the garden and setting up a decent working area was high on the list. We needed something to separate the working area from the rest of the garden that would be practical, look natural and if possible serve a function. Copied and adapted from something we'd seen back in Yorkshire at Worsborough Country Park, in Barnsley, using branches and twigs from coppiced and pruned trees, we formed a Fedge. A sort of cross between a fence and a hedge.


It has to be strengthened and posts replaced every couple of years but this small amount of maintenance is well worth it as it lives up to expectations in every way. The grass and wild flowers are left to scramble up it whilst the diversity of wildlife that has taken up residence  never ceases to delight us.


Toads, lizards, slow worms, stag horn beetles, woodlice, field mice and spiders live in natural balance alongside other insects and invertebrates. The insects pollinating the crops, the toads and the slow worms feeding on slugs, the slugs, snails and woodlice composting the vegetation, the birds feeding on insects and larvae, butterflies sipping the nectar from the wild flowers whilst all are occasionally challenged by a passing curious cat.

Slow Worm

Friday, April 01, 2011

Celebrating 50 years a vegetarian - well almost...

2 comments:
This year it will be approximately 50 years since I excluded meat or fish from my diet.  As a child I would always reject meat and hated fish unless either could be disguised in minced up, highly processed sausage or fish-cake. My parents despaired and eventually gave up trying to encourage me to eat flesh but had the good common sense to feed me lots of fresh vegetables, fruit, eggs and cheese, later followed by new vegetarian dishes that emerged on the market such as nut roast or soya products. We grew some vegetables when young and I remember having my own grave-shaped plot in which I grew a few cabbage and salad crops.


To mark this journey to sustainable vegetarianism, I intend to publish some of my favourite vegetarian recipes developed over a half century of not eating meat or fish. Surprisingly, the term vegetarian wasn't included in our day to day vocabulary back in the 1960s although the term has been in use since 1847. Looking back it was "he doesn't eat meat or fish", as simple as that. I made do when out and made up for it at home. There were brief periods when I could be encouraged to eat a burnt thin slice of crispy bacon or a bit of tinned salmon mixed with breadcrumbs and butter however, these experiments were usually short lived and never to be repeated.

The first recipe will be home-made hummus - simple, nutritious, versatile and tasty. Having made hummus for many years it was only after speaking to a Turkish lady here in Asturias that I started adding cumin. Needless to say, it was the missing link and truly adds depth of flavour to this easy recipe.


HUMMUS
350gm cooked chick peas and cooking fluid 
salt - half a teaspoon
garlic 5-6 bulbs (to taste)
2 large dessert spoons of tahini paste
lemon juice
Olive oil
fresh chopped parsley
chopped spring onions
Cumin - 1 teaspoon (to taste)

Blend or mash together chickpeas, tahini, ground garlic with salt, lemon juice with enough of the cooking fluid to form a loose pate type textured spread. Smooth is good but some texture can also be left in the paste. Stir in chopped spring onions, cumin, parsley and oil until well mixed. Adjust quantities to suit personal taste - will keep well in the fridge for up to a week but it never lasts that long. Best eaten in copious amounts with fresh-baked bread or clean, crisp celery. Spoonfuls can also be used as a tasty thickener for soups and stews.

Luis still eats meat when he knows of its origin and growth, and he still enjoys fish but equally these days values the variety that including vegetarian food in your diet gives you. Guests who visit invariably choose the vegetarian options and the many residents of our village who have tried vegetarian food at various village fiestas have always come back for seconds, which is great to see. Feedback on the recipes would be great.

Thursday, March 24, 2011

Growing vegetables: Peas

No comments:

Some people may find at times, that growing vegetables and gardening in general is something daunting and complicated by lots of information. Whilst difficult to make sense of for some, for others, gardening comes more natural. We both have encountered gardening throughout our lives and although we had created a flower garden in our previous home, it was while living at La Pasera that we started growing vegetables in a much bigger scale. My advise to people is to get a good book and not to be frightened to experiment, ask a friend for advice and to adapt the information available to the particular conditions your garden presents you in terms of soil structure, sun exposure and amount of rain.

Here at La Pasera, we have heavy clay soil, frost is rare as we live so close to the coast but high humidity and abundant rain fall do present us some challenges. One of them is how to increase the growing season and the range of vegetables we can grow.


Peas are a vegetable that we greatly value in cooking and like to grow as many as we can so that we can eat them fresh as well as preserve in the freezer after blanching. We found that although the heavy soil is slowly improving with the organic matter constantly being added to it, peas used to have a poor germination rate and we had to sow several times in order to get a few plants. The method we now employ works very well for us and the little extra work is well worth it as we guarantee a vary high germination rate a lot faster than using normal methods as described in all gardening books.

We love sharing our ideas and what works with the villagers, some of whom have adopted our methods. There are some local gardening techniques that we have incorporated and adopted to our particular needs with good results such as the use of well rotted farm manure for onion planting but this will have to wait for another blog entry.


To get back to pea growing, La Pasera style, we pre-soak the peas overnight in a bowl of cold tap water and in the morning we cover them with a damp cloth and are kept in a plastic container in a warm place until their tap root starts to show, the longer the root is the more vulnerable this is when it comes to handling the pea but the more you advance its growth. This way, we only use the peas that have germinated. They are planted in half a drain pipe using a mixture of well drained soil we make ourselves with our compost to which we add very well rotted manure, our own leaf mould and  some fine grit or vermiculite.

This process only takes a few days and once you sow the peas, they will take a further week to start showing through the soil. You need to ensure you place the pipe in a warm and protected position while keeping the soil wet at all times. It will be just another two weeks before they are big enough to transplant into their permanent place in the vegetable plot. As we cram in the pipe as many peas as we can get, their roots become entangled and you need to be careful while transplanting to ensure you damage their roots  as little as possible, they should be about two inches tall and will have plenty of vegetative growth. Water them in well and stake with pea sticks when they start developing the tendrils.

This is a very unorthodox or unconventional way of growing peas, most gardening books will not advise you on this method especially with the root damage that you might cause when transplanting but it works extremely well for us, the peas do not seem to mind any of the stages along the way and we certainly advance their growth. If you plant peas in the traditional manner, it may take up to 4 weeks for them to germinate especially if the soil is still a bit cold, but if you grow them La Pasera way, they will be two inches tall by the time you plant them out in about 4 weeks.

We have peas and mange tout currently growing in 3 different stages and the first lot has started blossoming in the past few days. Not bad if I may say so and I look forward to some shelling peas if all goes well.


Beetroots, lamb´s lettuces, raddishes, sweeds and turnips are other vegetables we grow this way. Other advantages from this method is that we can protect the young plants whilst they are at their most vulnerable stage from weather conditions and pests without the use of slug pellets or chemicals. Yes, it is rather fiddly and time consuming but well worth it. Several villagers have adopted and adapted this method. It is always good to share experiences in the garden. Good luck if you try this method.

Tuesday, March 15, 2011

Home-made hand cream with beeswax

1 comment:
Hand cream makes sense. If the skin on your hands is in good condition and intact, then the less likely you are to get infections, cuts and abrasions will heal better, your nails will be less brittle and dry rough skin will decrease. Men and women alike should use hand cream. Our lifestyle means our hands tend to get washed a great deal due to the work in the garden, kitchen, workshops and wood store. Having the cats and handling them at regular times of the day also means hands are washed more frequently. Maintaining skin integrity is important and therefore we use hand cream.

Commercial hand cream is often scented heavily or it contains numerous additional ingredients that we'd rather do without. The advance of technology and the development of nano particles is also something that concerns us as we wonder why it s necessary and the long term effects of using them is questionable in our minds.

We came across this recipe some time ago and adapted it to our own. The main ingredients are natural beeswax, almond oil, olive oil, water and pure essential oils. It is an easy recipe and results in a usable, natural hand cream that seems to work well.


The wax and oils are slowly melted in a bain marie until blended smoothly together. The bowl is removed from the heat and the the distilled water is carefully whisked into the mixture until emulsification takes place. If you add the water too quickly, it will separate when cooling and your end product will be unstable, When completely mixed and smooth, 50 drops of essential oils are mixed in until totally blended. The essential oils are chosen for their healing, antiseptic or therapeutic properties. The cream is divided up and placed in suitable containers and left to totally cool before the lids are placed.


One observation we have noted is that when we use commercial hand cream, our cats Wentworth and Gawber, do not like being stroked or held but with our home made product it does not seem to bother them, in fact they seems to quite like it and will often take an inquisitive sniff of our hands.


Basic ingredients: 80grams of Bees wax,  150 ml of almond Oil, 150 ml of olive oil, 50 drops of pure essential oil, 75 ml of distilled water.

Please note: essential oils have various properties, please conduct your own research before using them,