Showing posts with label Methods. Show all posts

Friday, June 12, 2015

June in the garden

6 comments:
The weather continues to be cooler than usual with several days of prolonged drizzle and low cloud. Sunny days have been few and far between but never-the-less the garden is looking colourful and filling out at a pace; sadly, the flowers do not last long enough when they get saturated in the persistent drizzle. We tend to wander around the garden daily to spot what is happening, to see what's in flower, prioritise weeding and spot any potential problems such as infestations and damage. We noticed several heavy infestations of aphids on the fruit trees. We had been told about a soap based product (soft potash soap) that is supposed to help eradicate such infestations so we bought some and have sprayed all the fruit trees to see if it works (50g/litre of water). We will let you know how efficient it is.


There are several spectacular flowers and plants in bloom at the moment including: The bird of paradise which we rescued from a house in the next village. It was constantly on the floor, dry and in a bad way so we knocked on the door and asked if we could take care of it. The lady said yes and with a bit of tender, loving care, it is back in great shape. It just needs re-potting now in something appropriately splendid.


The bee orchid is common in these parts but we have found some in the garden amongst the flowers -  We are not sure if it is a bee orchid or a woodcock ophry (thanks Nigel) as they are almost indistinguishable, they are truly lovely and we will encourage their spread. We now have at least four types of wild orchids that grow in the garden.


The Alliums are in full spectacle. As you approach they appear like miniature galaxies suspended in green space. Their structure and form are fascinating and a wonderful distraction.


A few years ago we planted a series of terracotta roof tiles with succulents. These were easy to make by blocking off the ends with pebbles and cement, filling with soil, adding plants and a few decorative pebbles and topping off with fine gravel. We have lined the steps down into the garden with them and they make a lovely addition and need very little attention.


Luis has been busy making mosaics in between all the other things we get up to. He has just completed two column bases for a mosaic table he made some time ago. They are designed so that they can be used independently but we will use them with the top as intended. The are a lovely addition to the terrace. We will feature them in-situ once fully dry (currently sealed and awaiting positioning).


Elsewhere the garden continues to keep us occupied with lots of fruit and vegetables to sow, maintain and harvest as appropriate. The lawns need regular cutting and the flower borders need dead-heading to prolong the flowering season. There is always something to do but it brings with it the opportunity to savour the beautiful colours, shapes and structures that nature provides. What do you enjoy in your garden?


Sunday, March 29, 2015

The first grass cut of the season.

4 comments:
The grass has taken a bit of a beating over winter with excess rain and a few rare frosts. The growth has remained stunted but it has given dandelions and daisy plants time to gain a strong-hold and proliferate now the better weather is here. After a couple of warmish days and light breezes, the grass is ready to be cut; the first of the season.


The grass cuttings are layered with dry material in the compost bins and overtime it will rot down and be put back into the garden. We try to make as much compost as possible; if you grow vegetables, you need as much compost as you can produce and more.


We don't have a lawn as such, the land used to be an old neglected orchard and meadow. It would be impossible to create the perfect lawn as we are surrounded by fields and meadows, plagued by land voles, abused by the wild boar and use the garden as a work, rest and play area. This suits us and as long as the grass/weeds/mosses are kept in check, it really doesn't look too bad.


We have just had the strimmer serviced and it is starting and stopping when it should, I think we really should have the petrol lawn mower serviced and sharpened as well as it is chugging along at times and takes some battering.


We have left most of the borders as they are filled with celandine's, primroses and narcissus. We also have a few wild orchids that are yet to show their heads so we will probably leave the grassy borders until May or June when we will strim or scythe and let the grasses and seed heads dry and fall before collecting.


It is a real pleasure to feel the warmth of the sun on your back again after what has seemed a really long and dull winter. We are looking forward to the months ahead in the garden and hope to finally finish the front gardens and driveway.


Saturday, February 14, 2015

Preparing the soil for Spring vegetable planting

6 comments:

We have a crop rotation system here that works well for us. With three large beds we can plot where and when we plant crops to ensure we make best use of companion planting, soil fertility and crop timing. Two of our three beds are still packed with winter crops such as celeriac, leeks, kalettes, cabbage, cauliflower, swede and kale.

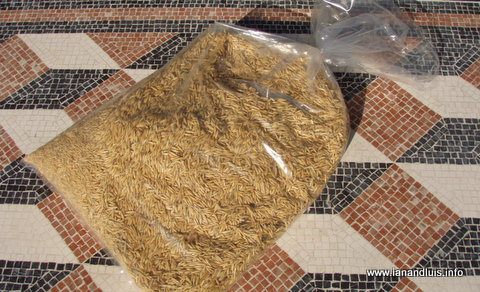
Following lots of wet weather the ground has dried sufficiently so that we are now able to do some work on the vegetable beds. The third bed was seeded with green manure (oats) back in Autumn, these are now ready to be dug in along with some home-produced compost. This will be left to rot down for several weeks before potatoes, onion and tomatoes are planted.


We have worked hard over the past few years to improve the soil structure as our beds were established on meadow land that was mainly solid clay. With the addition of sandy topsoil, raising the beds, adding as much compost and manure as we can get our hands on and annual sowing of green manure the soil has greatly improved. Earthworms are now abundant and help work the soil along with many other insects and micro-organisms. The soil is loose, full of organic matter and a much richer and more fertile ground in which to grow vegetables.


Elsewhere in the garden processing the coppiced wood continues and we are gradually building up a good stock of kindling for use next winter. There is life again in and around the garden with visiting deer and wild boar. Sadly, as I write this blog-post I can see the hunters in the bottom field and I can hear their dogs frantically rooting out anything that moves in the nearby woodland. I just hope these three nightly visitors stay safe...


Monday, December 01, 2014

Working with a chainsaw - evaluating the Log Master

2 comments:
Last week we spoke about the acquisition of a new bit of kit - a Log Master. We have now used it and here is what we think.


Before our evaluation, just to let you know, we have no commercial interest in this product, just a personal wish to stay as safe as possible and as free from injury whilst using dangerous equipment. You should always carry out your own research, read instructions and take note of health and safety issues before using any tools or machinery.

We tend to process a lot of wood each year despite buying the bulk of it already cut to an appropriate length. We are often gifted fallen or dying trees which need processing or we have to cut our previously purchased wood in half to fit the smaller log burner which is sited in the studio (this saves buying two different lots).

The trees we fell are processed on site then transported back home where we will cut and spilt them into an appropriate size. Up until now we have cut the wood to size using a home-made saw horse for supporting the logs and branches as they are cut with a chainsaw. This has always been a two man operation, one to hold the logs/branches and one to operate (with two hands) the chainsaw. No matter how many health and safety precautions you take e.g, the right protective gloves, clothing, the correct position and posture, the regular and correct maintenance of the chainsaw etc, there is always a feeling that something unexpected could happen and accidents could occur especially if you have a momentary lapse of concentration. In short, we were never totally happy working this way.


On coming across the Log Master, I was encouraged by the sturdy metal saw horse that came complete with a guarded clamp/mount for a standard sized chainsaw. In essence this would allow a one handed operation of the chainsaw leaving one hand to hold the log secure in the saw horse. The addition of a guard protecting the top of the chainsaw was an additional draw as this would minimise the possibility of broken chains causing serious injury. Anyone who has used a chainsaw for an extended period of time, will recognise that is does put a strain on your back, hopefully, a one handed operation will also minimise this.

The review:

Setting up the Log Master - The sawhorse and clamp feel a good weight and well made. Putting together the various elements was straight forward enough with minimal tools required. The instructions were clear and photographs helped. The only slight hurdle was positioning the clamping mechanism correctly to ensure the chainsaw could pivot fully but this was soon sorted. We made sure the chain was sharp, the chainsaw refuelled and filled with oil before mounting. Positioning the chainsaw in the clamp was easy enough but it was helpful to have a second pair of hands to hold the chainsaw in position whilst the clamp was being tightened. Making sure the clamp handle did not interfere with the operation of a the pivot was also something that became obvious early on.

We cut the wood on rough ground near the wood store so the addition of adjustable legs was a bonus which ensured the saw horse and chainsaw were stable. We were also able to adjust the height of the sawhorse to a comfortable level to avoid working with a bent back.


Using the Log Master - The chainsaw was mounted so starting up was a different experience but nothing we couldn't manage. Our chainsaw tends to be temperamental when cold and you need to keep it on low revs for a while until warmed up so we couldn't just leave it ticking along in the clamp. Saying that, once it was warm we could walk away and leave it running whilst loading the next log. The cutting action felt very different as well with one hand and on a vertical pivot action. It was noisier than usual but that was probably due to the saw horse and guard being metal whereas before our sawhorse was wooden. The pivot was self-limiting which ensured you could not cut through the cutting guide. We both used the chainsaw and Log Master and found that it felt safer, easier to use individually and together, put less overall strain on the back and once used to the pivot movement, it was an efficient way of cutting.

Conclusion - We both felt much safer using the Log Master although in our excitement we forgot to wear goggles and a face guard... which in it's own way gives us an important message: Don't be lulled into a false sense of security. With the mounted chainsaw, guard and one handed operation it is easy to forget that the chainsaw is one dangerous piece of kit and should be treat with respect at all times. We both feel it was a good investment (just over £100) and would recommend it to anyone who uses a chainsaw for domestic wood cutting. It cleaned down easily after use and with the chainsaw removed, folded flat for easier storage.


Stay safe - stay warm...


Thursday, November 06, 2014

How we prepare the vegetable plot for Winter

7 comments:

As the days get shorter we start noticing a drop in the temperatures, especially first thing in the morning, that contrast with the hot sunshine we experience in the middle of the day. This warmth encourages a spur of growth not only in the vegetable plot but also in the garden and miniature gardens where the Lithops or pebble plants start to bloom.


The hot and dry weather we tend to get by the coast at this time of the year encourages the last of the aubergines and peppers to ripen whilst the Winter crops start coming into their own. In another post I will write about what is happening with the crops that we will be harvesting as Autumn deepens and Winter becomes closer.


The red peppers will be bottled, we freeze the green ones to use later in cooking whilst the aubergines we will be frozen after they are grilled or made into a pate.


In the vegetable plot, one of the main jobs we normally undertake at this time of the year is the clearing and composting of all those vegetable plants that have come to an end and digging of the soil in readiness for sowing oats as green manure.

Home made compost is a valuable resource and you can never have too much. This year the Summer months were unusually dry and as a result the garden produced a much smaller amount of organic matter that goes into the compost bins. At the beginning of Autumn, one of our compost bins was only half full and the other completely empty rather than both been bursting to the rim. We brought a few barrow loads of dry grass from a nearby meadow that our neighbour would have otherwise burnt. This grass comes from a meadow where animals graze and no chemicals have been used.


An important health and safety aspect to take into account when dealing with drying grass is the amounts of spores that semi rotten grass produces. These spores are a respiratory sensitisers and can lead to chest problems if breathed, hence the use of a mask. 

With the several barrow loads we brought in, we should have enough compost to dig into the soil when the next growing season starts in late February or early March. As the grass was rather dry, we had to water it to ensure it rots over the Winter months. 


Another of the big jobs that we normally undertake before the wet and cold weather season starts is the preparation of the soil in the areas now empty of growing plants in readiness to sow the oats as a green manure.

We considered buying a mechanical rotovator but decided against this once we found out that using these devices would kill most of the earthworms, an invertebrate whose benefits to the soil are numerous as they help the break down of organic matter and improve soil structure with the tunnels they create which also help improve soil compaction and aeration. Consequently, we use a spade or garden fork to dig the soil. It is nice to see how the earthworm population appears to increase year after year and as a result of the organic matter added to the soil.


Once the soil is dug over, a light sprinkling of oat seeds is applied over the whole surface before the seeds get gently raked into the soil. Some people leave the oat seeds to germinate whilst they lay on the soil surface. We favour covering them lightly with soil by raking them in.

As the oats grow, their roots reach deep into the soil breaking it up and thus improving its structure. With the oats covering the surface of the soil, seeds from weeds are less likely to germinate. The benefits from sowing oats or any other type of green manure at this time of the year are many.


We will often see Gawber and Wentworth eating tender oat shoots to purge themselves, another good reason to continue sowing oats at this time of the year. We find the oats will start germinating within 7 to 10 days depending on weather condition such as warmth and humidity.


Thursday, July 24, 2014

Vegetables, salad and soft fruit crops we are growing: 2014-15

2 comments:
We thought it might be useful to make a list of the vegetables we are growing in 2014 through to Spring 2015. It will be useful for us to document it and also give our readers some idea of the range of food that can be grown in a temperate climate that has all year round growing conditions.


We use a crop rotation system that makes the best use of companion planting in the two large and two smaller raised beds situated past the orchard at the bottom of the garden.

Product
Cropping 
Celeriac
Feb 2015
Carrots
October 14
Beetroot
Since April through to February 2015
Tomatoes, Spring onions
Current
Leeks
September onwards
Cauliflower, Broccoli, Flower Sprouts
November onwards
Turnip, Swede and Chard
November onwards
Aubergine, Peppers, Butternut Squash
September onwards
Beans (various)
Current
Basil, Parsley, Coriander
September onwards
Lemon Grass and various herbs
Current
Fennel
Ongoing until early Spring
Marrows, Cucumber and Kohl Rabi
Ongoing until September
Chili Peppers
Current
Raspberries and Blackberries
Current
Red and Black Currants
Cropped and frozen
Peas, Onions and Potatoes
Cropped and stored
Winter Lettuce
November onwards
Gooseberries
Crop Failure 2014
Horse Radish
November


No doubt we will be challenged with black fly, aphids, opportunistic intruders, mildew, watering, wild animals and birds but with careful management, pest control and natural defences such as companion planting, we should be able to provide more than enough fresh vegetables, salad crops and soft fruit to see us through the year for eating, processing into jams and pickles and, for preserving in the dehydrator or freezer. The excess we will distribute amongst friends or compost and return the goodness to the soil.


In addition to the vegetables we also grow a range of fruit including peaches, oranges, apples, pears, plums, greengage, rhubarb and physalis as well as a range of plants we will use in hand-creams, soaps and herbal teas: lemon verbena, lemon balm, mint, calendula, lavender, comfrey, sage and so on...

Lemon Verbena - harvested for drying

There is little doubt that growing your own food is hard work and never ending but the rewards are worth the effort. In our experience, it tastes so much better and we can be confident that no harmful chemicals have been used in its production. Friends often say that they wish they had the space to grow food, our reply is always the same: a window box, tub or series of plant pots can produce quite a bit of food. If you've thought about growing your own but never got around to it, it is not too late, have a go and let us know how you get on.

Geraldine the Hedgehog - slug control...


Monday, May 05, 2014

Time to make a luscious tea loaf

8 comments:
The tea loaf is quintessentially British or to be more specific, Yorkshire in origin. No doubt some of you will be screaming "that's not true" at the screen as you read this, but it is, I should know being a Yorkshire man...


There is nothing more luscious, in my opinion, than a slice of tea loaf spread thick with butter served in the shade of a sunny terrace with a cup of strong tea or lemon verbena infusion. Luscious because it has scent is to die for with the aroma of cinnamon, ginger and nutmeg permeating the air as you raise a slice to your mouth and take a bite of the moist, fruit-laden loaf.


It is quite difficult to get dried fruit here in Spain and when you come across it, more often than not it is in small 100gm bags. I usually stock up with dried fruit in the UK and periodically use it to make this lovely afternoon tea treat.


The recipe we use has been adapted to suit our taste and with the reduced sugar, additional spices and earl-grey tea, it has proved very popular with our neighbours and friends who happen to to be around when tea loaf is on offer.

Tea Loaf

These quantities will make three loaves but they freeze well so you don't have to eat them all at once...

225g raisins
225g sultanas
225g currants
50g mixed peel
900ml of tepid Earl Grey tea
250g brown sugar
750g self-raising flour
3 eggs
3 tsp cinnamon
3 tsp nutmeg
1 tsp ginger

Soak the fruit overnight in in the tea. Next day add the flour, sugar, beaten egg and spices, mix well. Spoon into greased or lined loaf tins and transfer to a pre-heated oven 175c /Gas 3 for 60-75 minutes until an inserted skewer comes out clean. Cool and serve with butter and jam to taste.


A true Yorkshire treat made with the finest Yorkshire ingredients... ;-)

Go on spoil yourself...


Monday, March 10, 2014

Soft-fruit manoeuvres

8 comments:
Next to the vegetable beds we have a long and narrow bed for soft fruit: raspberry, gooseberry, blueberry. We have never been happy with the soil in this bed as it is mainly the original clay from the meadow with very little else mixed in. This year we decided it was time to upgrade it by forming a raised bed.


We constructed the bed out of the same wood the vegetable beds are made of; this allows us another 25cm of soil to be added. The bed now measures 9 m x 1.2 m.


We added lots of home-made compost and horse manure. The raspberry canes were sorted and a few decent ones re-planted. The blueberry are a pretty sorry sight but we'll give them another go and if they do not take off, we'll replace them at the end of the year. The gooseberry is one of several we have dotted around the garden and they seem to do well. We'll put some rhubarb leaves under the bush to prevent sawfly and hope for an abundant crop. Hopefully we'll have plenty to make our favourite gooseberry and mustard seed pickle.


Meanwhile, we have cut the red and black current bushes back, creating the classic goblet shape and we need to tackle (trim and tie) the blackberries that run 6 meters along the fence.